This article teaches you how to install SNMP on your Windows Servers and how to configure it.
Table of Contents
What is SNMP and why use it on Windows Server?
SNMP might look like an old-school protocol nowadays. But it fast, lightweight and reliable. For servers and switches SNMP is THE monitoring protocol and can even be used to configure your hardware.
Windows Servers on the other side are often queried and managed with WMI. WMI offers a lot of functionalities and can be used for almost any task you want to perform on a server or client.
The downside of WMI is that it is not as fast as SNMP. Also is consumes more resources. Just to visualize the difference: The monitoring software PRTG recommends that you do not run more than 5.000 sensors on one server. For WMI sensors, the number should not exceed 200 per monitoring server.
How to install SNMP on Windows servers
Using the GUI
Open the Server Manager. Click on Manage and select Add Roles and Features.
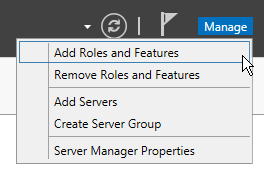
Server manager: Add Roles and Features
Click through the assistant until you can select the features to be installed. Check SNMP Service. SNMP WMI Provider allows to query other SNMP devices with WMI. But this is not required to monitor your server via SNMP.
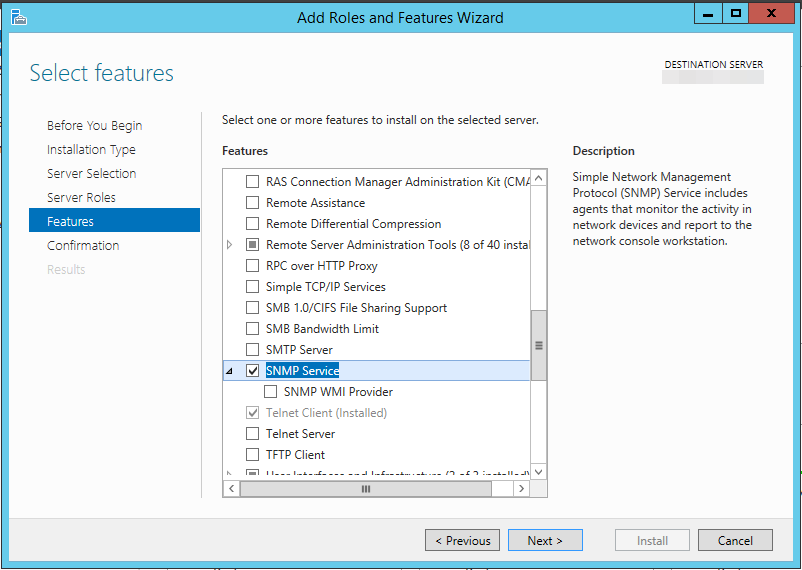
Server manager: Select the SNMP feature
Click next until the wizard is completed. Then wait for the installation to complete. You will find a new service SNMP Service (SNMP) running on your server.
Using Windows Admin Center
Log on to your Windows Admin Center and select to server you want to add SNMP to. On the left side, select Roles & features. Here scroll down to the features and select SNMP Service. SNMP WMI Provider allows to query other SNMP devices with WMI. But this is not required to monitor your server via SNMP.
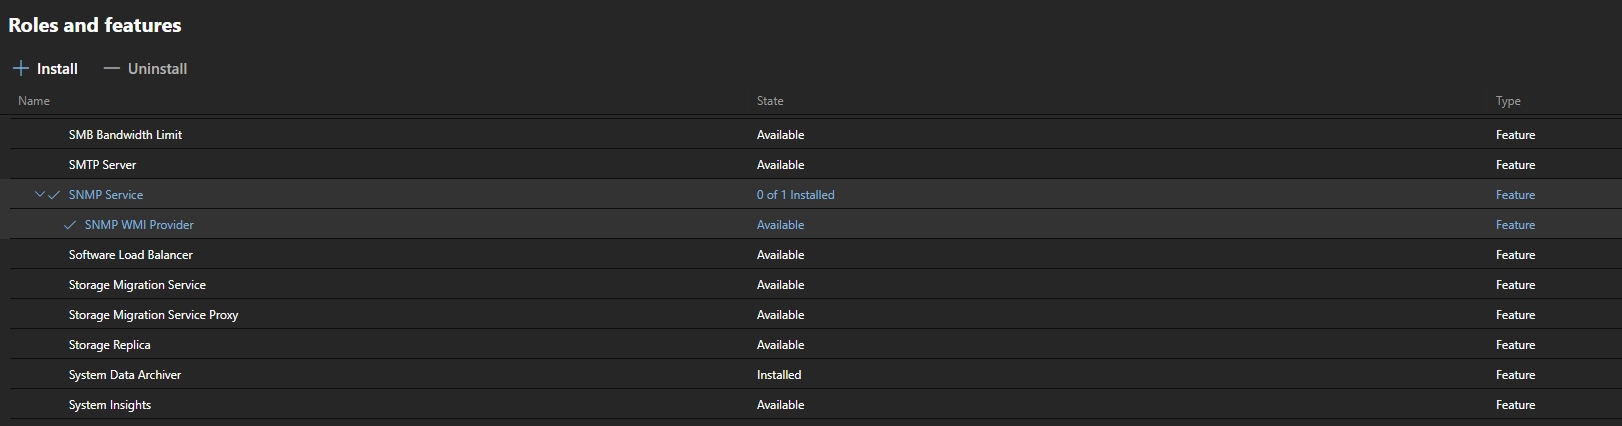
WAC: Select feature
click Install on top of the list. A new window will appear which summarizes the roles and features to be installed.

WAC: Confirm installation
Click yes if you want to start the installation.
Wait for the installation to complete.

WAC: Installation completed
You will find a new service SNMP Service (SNMP) running on your server.
On Windows Server core / Powershell
Log on to your system or enter a Powershell session on your server.
First check if SNMP is available and has not been installed already
Get-WindowsFeature SNMP*

Powershell: Check SNMP status
Now you can install SNMP.
Install-WindowsFeature SNMP-Service
If you need the SNMP WMI Provider, just add -IncludeAllSubFeature to your command.

Powershell: Install Windows feature
You will find a new service SNMP Service (SNMP) running on your server. You can check the status with this command:
Get-Service SNMP
Configure the SNMP service
Using the GUI
Please note that you might have to restart your server in order to display the tabs for that service.
Open the services management (services.msc). Search for SNMP Service, right click and select Properties.
The new window shows additional tabs for configuring SNMP.
Agent tab
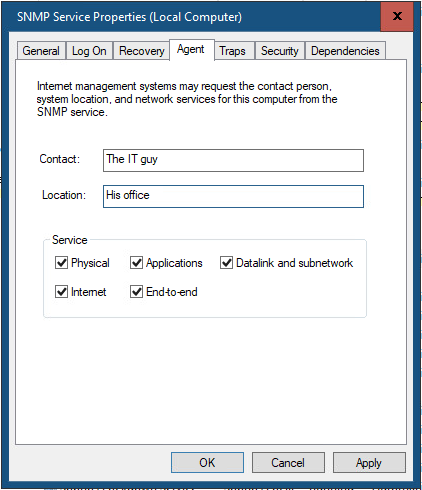
SNMP Agent tab
These are general settings for your endpoint. Contact and location are information which can be displayed in your monitoring software to easily determine where that server is and who is managing it.
Below Service you can specify which information you want to retrieve from the server.
Traps tab

SNMP Traps tab
Setting up traps, requires one or more communities to be used. For each community you need to define one or more destination server for the trap to be sent to.
Security tab
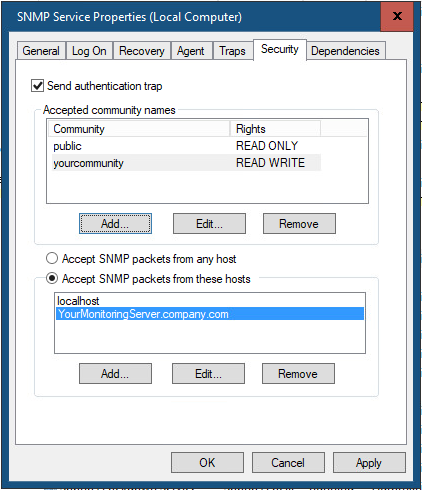
SNMP Security tab
The first setting is called Send authentication trap. This checkbox specifies if your server will send a trap if an unknown community is used to query the system (Which could hint to an attacker probing for communities.
The first list contains the accepted community names. For each community you have to specify which rights are assigned to it.
The last option is whether you like to accept SNMP packets from any host or you want to restrict to certain hosts only.
Using Powershell / Group Policies
Unfortunately Powershell does not offer dedicated cmdlets for SNMP and the SNMP administrative templates are for Server 2003 and do not offer all options the GUI has.
Therefore configuration has to be done using the registry keys.
The registry path for the SNMP service is HKEY_LOCAL_MACHINE\SYSTEM\CurrentControlSet\Services\SNMP\Parameters
Agent settings
Contact and Location are both simple string (REG_SZ) values:
HKEY_LOCAL_MACHINE\SYSTEM\CurrentControlSet\Services\SNMP\Parameters\RFC1156Agent\sysContact is the lontact
HKEY_LOCAL_MACHINE\SYSTEM\CurrentControlSet\Services\SNMP\Parameters\RFC1156Agent\sysContact is the location
New-ItemProperty -Path "HKLM:\SYSTEM\CurrentControlSet\services\SNMP\Parameters\RFC1156Agent"  -Name "sysContact" -Value "Contact" -PropertyType REG_SZ
New-ItemProperty -Path "HKLM:\SYSTEM\CurrentControlSet\services\SNMP\Parameters\RFC1156Agent"  -Name "sysLocation" -Value "Location" -PropertyType REG_SZ
The services each have a value assigned:
| Service | Value |
|---|---|
| None | 0 |
| Physical | 1 |
| Applications | 64 |
| Datalink and subnetwork | 2 |
| Internet | 4 |
| End-To-End | 8 |
If you are not using a GUI to configure the service, use sum the values of the services. Example: Applications and Physical has the value 65 (64 for Applications + 1 for Physical).
Allowing every service requires the value to be 79 (decimal)
New-ItemProperty -Path "HKLM:\SYSTEM\CurrentControlSet\services\SNMP\Parameters\RFC1156Agent" -Name "sysServices" -Value 79 -PropertyType DWord
Traps settings
For each community you need to create a new key (Or subfolder) in HKLM:\SYSTEM\CurrentControlSet\services\SNMP\Parameters\TrapConfiguration with the name of the community.
New-Item -Path "HKLM:\SYSTEM\CurrentControlSet\services\SNMP\Parameters\TrapConfiguration\public"
Within this key, you need to enter each trap destination as a separate value and the name start from 1 and counting up:
New-ItemProperty -Path "HKLM:\SYSTEM\CurrentControlSet\services\SNMP\Parameters\TrapConfiguration\public"  -Name "1" -Value "yourlogserver.company.com" -PropertyType REG_SZ
New-ItemProperty -Path "HKLM:\SYSTEM\CurrentControlSet\services\SNMP\Parameters\TrapConfiguration\public"  -Name "2" -Value "yoursecondlogserver.company.com" -PropertyType REG_SZ
Security settings
The first option are the authentication traps. This is a simple 0 or 1 value where 0 is disabled and 1 is enabled.
New-ItemProperty -Path "HKLM:\SYSTEM\CurrentControlSet\services\SNMP\Parameters" -Name "EnableAuthenticationTraps" -Value 1 -PropertyType DWord
Your accepted communities are added to HKEY_LOCAL_MACHINE\SYSTEM\CurrentControlSet\Services\SNMP\Parameters\ValidCommunities as DWORD with the value indicating the permission:
| Value | Permission |
|---|---|
| 1 | None |
| 2 | notify |
| 4 | read only |
| 8 | read write |
| 16 | read create |
New-ItemProperty -Path "HKLM:\SYSTEM\CurrentControlSet\Services\SNMP\Parameters\ValidCommunities"  -Name "public" -Value 4 -PropertyType DWord
New-ItemProperty -Path "HKLM:\SYSTEM\CurrentControlSet\Services\SNMP\Parameters\ValidCommunities"  -Name "yourwritingcommunity" -Value 8 -PropertyType DWord
And finally the accepted SNMP sending hosts:
These are added to HKLM:\SYSTEM\CurrentControlSet\Services\SNMP\Parameters\PermittedManagers as sub values with the name starting at 1 and counting up.
New-ItemProperty -Path "HKLM:\SYSTEM\CurrentControlSet\Services\SNMP\Parameters\PermittedManagers"  -Name "1" -Value "yourmonitoringserver.company.com" -PropertyType REG_SZ
New-ItemProperty -Path "HKLM:\SYSTEM\CurrentControlSet\Services\SNMP\Parameters\PermittedManagers"  -Name "2" -Value "localhost" -PropertyType REG_SZ
Thank you for the article, but there is one little typo:
instead of Install-Windows Feature SNMP-Service it should be Install-WindowsFeature SNMP-Service (No space between Windows and Feature).
Thanks for the info. I have changed the command accordingly.