
Everybody knows that SMBv1 is unsecure, but some of us still have support it. Learn how to use a SMB proxy to protect your servers and still support your SMBv1-only machines.
We all know that SMBv1 is deprecated, insecure and must not be used anymore. It is over 30 years old and has not been designed with security in focus. Recent ransomware attacks like WannaCry showed how much of a threat SMBv1 poses.
The reality is (unfortunately) that enough admins are required to support these systems or machines with their old protocols. Many companies will not or cannot upgrade/replace manufacturing machines or other devices which support SMBv1 only.
So how do you secure your servers and network while supporting these old and crappy devices? Use an SMB proxy. This system receives every SMB connection request from insecure systems and accesses your servers using SMBv3 for them.
Table of Contents
Network requirements
There are multiple ways to set up your network for an SMB proxy. A recommendation is to put your insecure machines/system into a separate vLAN and to restrict the network traffic from/to that vLAN with a firewall.
You can leave the SMBv1 machines in your default vLAN, place the proxy there too and point your machines to the proxy, but this still allows a compromised system to access a large part of your network.
For this tutorial I assume that your shopfloor (Where the insecure systems are) and your servers are in a separate vLAN and you have a firewall in place which restricts communication between the vLANs. The firewall allows your machines to communicate with the smb proxy using SMBv1,v2 and v3 and lets the proxy connects to your file servers using SMBv3 only.
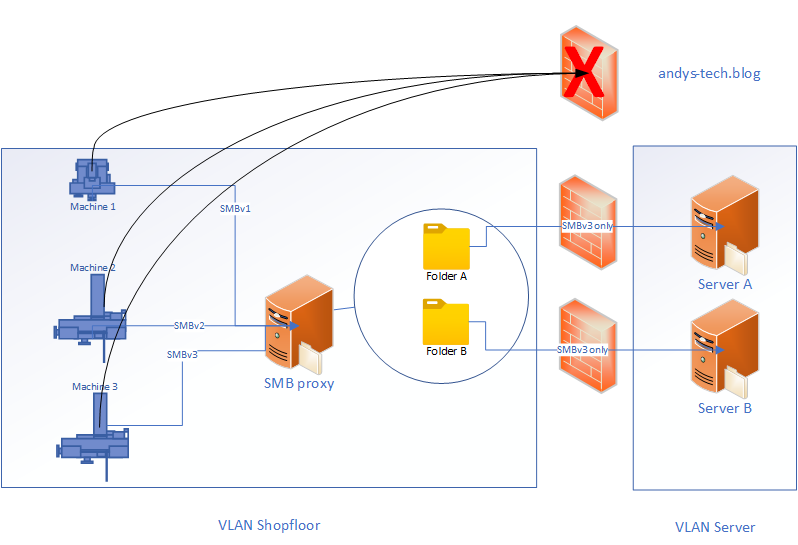
SMBv1proxy network diagram
Prerequisits
- Separate your clients, servers and insecure systems into different vLANs (Recommended, not part of this tutorial)
- Create the necessary firewall rules (Not part of this tutorial)
- Install a linux system (Not part of this tutorial, but the necessary steps for setting up the proxy are described here)
- A user on the file server to access the files from the proxy (Either local or Active Directory user). In this tutorial this will be the user smbv1-proxy-user
- A user name and password for your machines to access the proxy In this tutorial this will be the user proxy-access-user
- List of servers+shares+Subfolder to access from the proxy. In this tutorial this will be the server myfileserver and the share shopfloor plus a subfolder mysubfolder within the share.
- List of shares to provide to your machines. In this tutorial this will be the share shopfloor for the root folder and the share subfolder for a subfolder.
Remark about Linux
For this tutorial I am going to use an Ubuntu server. You may use any other Linux distribution, but some commands might differ.
And if you are an administrator in a microsoft-only environment: Fear not, I will make this tutorial as Linux noob friendly as possible.
Installation
1. Set up the Samba server
The Samba server is installed pretty easily:
sudo apt install samba
2. Store file server credentials
Your file server user credentials need to be stored into a file on the proxy server. This file will be referenced so that the proxy knows how to log on to your file server.
I prefer to name to file for each file server with smbproxy as prefix and credentials as suffix:
sudo vim /etc/smbproxy-myfileserver-credentials
As this will create a new file, you can start typing. Your content should look like:
username=smbv1-proxy-user
password=EnterSecurePasswordHere
If your user is a domain based, you have to add the domain to the file:
username=smbv1-proxy-user
password=EnterSecurePasswordHere
domain=example.com
After entering your information, press ESC and then :wq and ENTER to save the file and exit the editor.
3. Connect to your file server
The first step is to ensure, that your system has the cifs utilities installed. Enter the command:
sudo apt install cifs-utils
Now we have to add the file server share to the file system table:
sudo vim /etc/fstab
Press A (Capital A) to switch to insert mode and move to the end of the file and add a new line. The new line contains the following commands:
sudo apt install cifs-utils
Now we have to add the file server share to the file system table:
//myfileserver/shopfloor /mnt/myfileserver cifs user,uid=1000,gid=1000,vers=3.11,credentials=/etc/smbproxy-myfileserver-credentials,auto 0 0
You need to change the file server, share and credential file, if you are using different names.
Depending on your Windows (Server) version you have to use different CIFS versions. This is set by the vers= command.
Here are the supported CIFS versions:
| Windows version | CIFS version |
|---|---|
| Windows Server 2016+2019 Windows 10 1607 and newer | 3.11 |
| Windows Server 2012R2 Windows 8.1 | 3.02 |
| Windows Server 2012 Windows 8 | 3.00 |
Again press ESC and then :wq and ENTER to save the file and exit the editor.
If the steps have been completed, we can check if it is working by mounting the file share:
mount /mnt/myfileserver
4. Create local user for your machines
Now it is time to create a user for your machines to connect to the proxy:
First we create a user proxy-access-user.
adduser proxy-access-user
This user is not allowed to log on locally:
usermod proxy-access-user --shell /usr/sbin/nologin
Of course this user needs a password:
smbpasswd -a proxy-access-user
And it needs access rights for the mounted file server share.
chown -Rv proxy-access-user:proxy-access-user /mnt/myfileserver
5. Set up Samba shares
The next step if to the Samba which share(s) we want to provide to our shopfloor machines. The entire configuration is handled in the configuration file /etc/samba/smb.conf.
Open it with the editor:
sudo vim /etc/samba/smb.conf
The file already contains a lot of configuration items. You can use them if you want or clear the file and start from scratch. If you want to clear the file, enter gg to jump to the first line and then dG to delete the content.
Here is the required content of the file:
[global]
lanman auth = Yes
load printers = No
log file = /var/log/samba/log.%m
logging = file
map to guest = Bad User
max log size = 1000
ntlm auth = ntlmv1-permitted
obey pam restrictions = Yes
pam password change = Yes
panic action = /usr/share/samba/panic-action %d
passwd chat = *Enter\snew\s*\spassword:* %n\n *Retype\snew\s*\spassword:* %n\n *password\supdated\ssuccessfully* .
passwd program = /usr/bin/passwd %u
server min protocol = NT1
server role = standalone server
server string = %h server (Samba, Ubuntu)
unix password sync = Yes
usershare allow guests = Yes
wins support = Yes
idmap config * : backend = tdb
browseable = No
case sensitive = Yes
ea support = No
map archive = No
store dos attributes = No

#File share 1 shopfloor
[shopfloor]
browseable = Yes
create mask = 0777
directory mask = 0777
force create mode = 0777
force directory mode = 0777
force group = proxy-access-user
force user = proxy-access-user
path = /mnt/myfileserver/shopfloor
valid users = proxy-access-user @proxy-access-user
write list = proxy-access-user @proxy-access-user

#File share 2 subfolder
[subfolder]
browseable = Yes
create mask = 0777
directory mask = 0777
force create mode = 0777
force directory mode = 0777
force group = proxy-access-user
force user = proxy-access-user
path = /mnt/myfileserver/shopfloor/mysubfolder
valid users = proxy-access-user @proxy-access-user
write list = proxy-access-user @proxy-access-user
The settings below [global] can stay. For each share you want to provide, you need to add a new section beginning with [sharename]. In the settings below, you mainly need to change the path.
If you want to use different users for your shares, you have to go back to the user creation and change the users and groups in the Samba config file.
Press ESC and then :wq and ENTER to save the file and exit the editor.
Test your connection
This completes the installation and the setup of your Samba server and file server mounts.
You can now test the connection to the proxy.
The connection SMB proxy to file server have we checked earlier, so this should work at this point.
Also recheck if your CIFS version is compatible to your file server Windows version. Otherwise change the file /etc/fstab.
I’ve found this article really interesting.
I’ve tried to implement this solution in my infrastructure but I’m not able to make it working.
My file server is Windows based with NTFS drive.
When I try to access the smb1 share on the linux machine I’m able to read the content only if I set permissions to “Everyone” on the file server, but I think this was not the expected solution.
Additionally, I’m not able to write into the share even if I set write permission to “Everyone” on the file server.
What am I missing here?
Any clues to point me in the right direction would be much appreciated.
Hi Matt.
the procedure is correct, the only error I found is that in the lines
force group = proxy-access-user
force user = proxy-access-user
I replaced it with administrator, who in my case is the user who installed the Ubuntu server
note: I’m not a Linux expert!!! let’s say I read and reread this
https://administrator.de/forum/smb1-proxy-auf-debian-11-7-nur-leserecht-7376334509.html
and in my immense ignorance of Linux I think I found the reason why it didn’t work for me, now in fact I can make the proxy work in a test environment on vmware… in production it will be worth trying
Hi,
I try this phantastick manual. Is this command really correct at the Point ? :
3. Connect to your file server…
Press A (Capital A) to switch to insert mode and move to the end of the file and add a new line. The new line contains the following commands:
sudo apt install cifs-utils