Tickets regarding access rights can be very annoying and time consuming. With Windows Server 2012 Microsoft has implemented a new feature “Access-denied assistance”, which allows users to create a ticket from the access denied error message.
Depending on how your IT is organized, the handling of access rights can be time consuming and simply annoying. Especially small and mid-size enterprise often do not have the infrastructure to automatically assign users rights. Leading to tickets like “I do not have access to f:\department\VeryImportantFile.xls” (Which in general is not that important).
As of Windows Server 2012 Microsoft provides a new way to handle requests for access rights, making this process less frustrating (An automated process with approval workflow is still to be preferred, but IT processes are rarely ideal).
What you need to use this new feature are:
- Windows Server 2012 or newer (I’m demonstrating it on the 2012 R2)
- Clients with with Windows 8 or newer (I’m using Windows 10 for this post)
- An email server
I assume that you already have installed the file server role on your system.
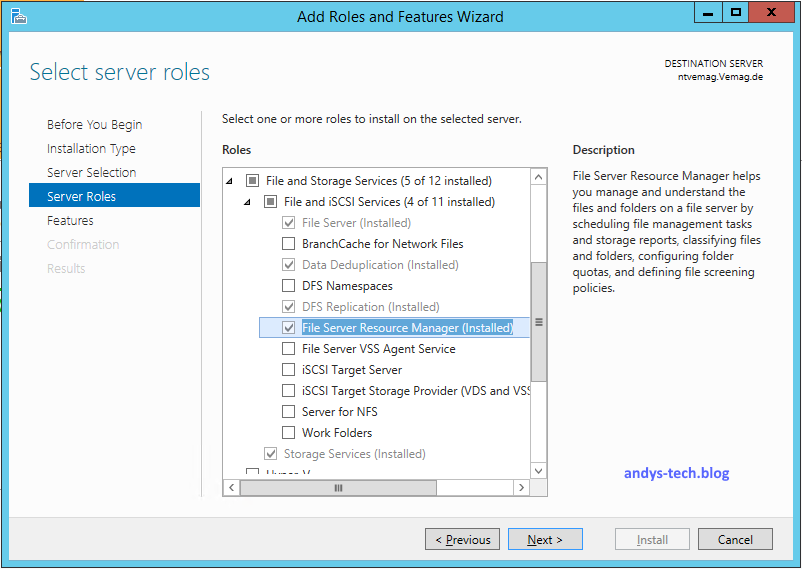
1. Install File Server Resource Manager
The first step is to install the File Server Resource Manager. You can either install it via the Server Manager:
or via PowerShell:
Install-WindowsFeature -Name FS-Resource-Manager -IncludeManagementTools
2. Setup mail notification
Now you have to setup the mail notifications.
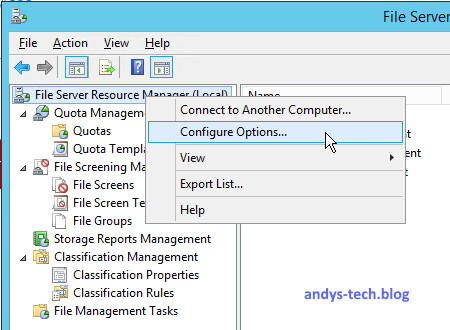
Open the File Server Resource Manager and right-click “File Server Resource Manager (local)” (Assuming that you will configure the local server). Now click “Configure options…”.
The next screen contains the basic setup fields for the email notification:
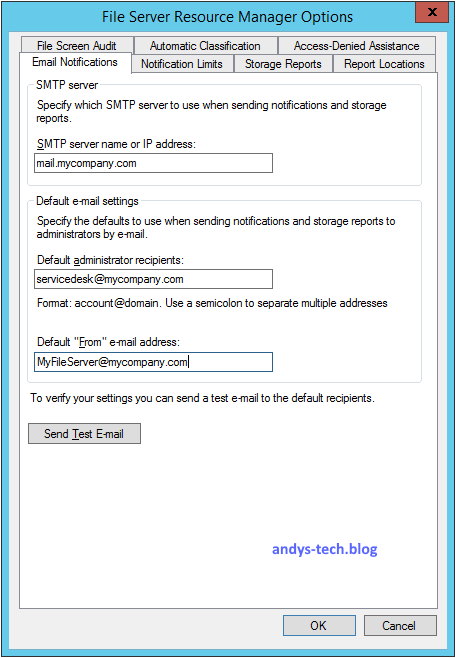
The smtp server should be your mail server. Please note that you cannot provide login information, so the server needs to accept anonymous logins.
The default administrator recipients are the email addresses to notify. You can use your ticket system or any other mail address you like. You can also define multiple addresses separating with a semicolon.
The default “FROM” address is the mail address from which the mails will be sent from. Please check, if this mail address is accepted as sender by your mail server.
Alternatively you can do this via one PowerShell command:
Set-FsrmSetting -SmtpServer "mail.mycompany.com" -FromEmailAddress "MyFileServer@mycompany.com" -AdminEmailAddress "servicedesk@mycompany.com"
And test your settings with this command:
Send-FsrmTestEmail -ToEmailAddress "testmail@mycompany.com"
Setup Access Denied Assistance
The last step is to setup the assistance.
Open the tab “Access-denied assistance”.
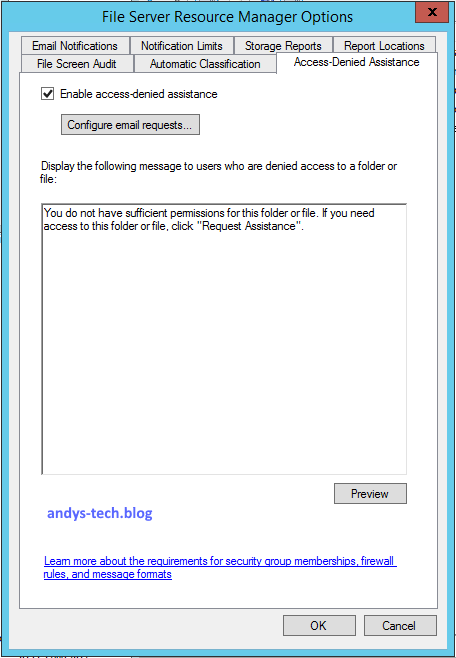
Check the “Enable access-denied assistance” box. This will let you display a custom message from the text box below. You can add certain placeholder to the message:
- [Original File Path] The original file path that was accessed by the user.
- [Original File Path Folder] The parent folder of the original file path that was accessed by the user.
- [Admin Email] The administrator email recipient list.
- [Data Owner Email] The data owner email recipient list.
Please note, that users will not be able to send a message now. Click “Configure email requests…” to complete the setup.

This screen contains the main settings for the assistance. As you can see, you can define the settings only global. This means, that you cannot define different rules for different folders or drives.
Check “Enable users to requests assistance” to active the general functionality.
If you like to include additional information in the mail, check “User information” and “Device state information”.
You can send this mail to the administrator(s) and/or Folder owners by checking the according box. If you like to notify additional accounts, enter them in the recipient list and add more information in the text field below, if you like.
The last option defines if an event log entry is created, if a user requests assistance. This will create an entry in the application log with the source SRMSVC and the event id 16402.
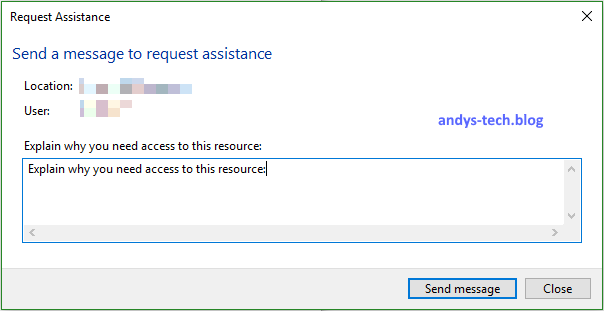
User’s side
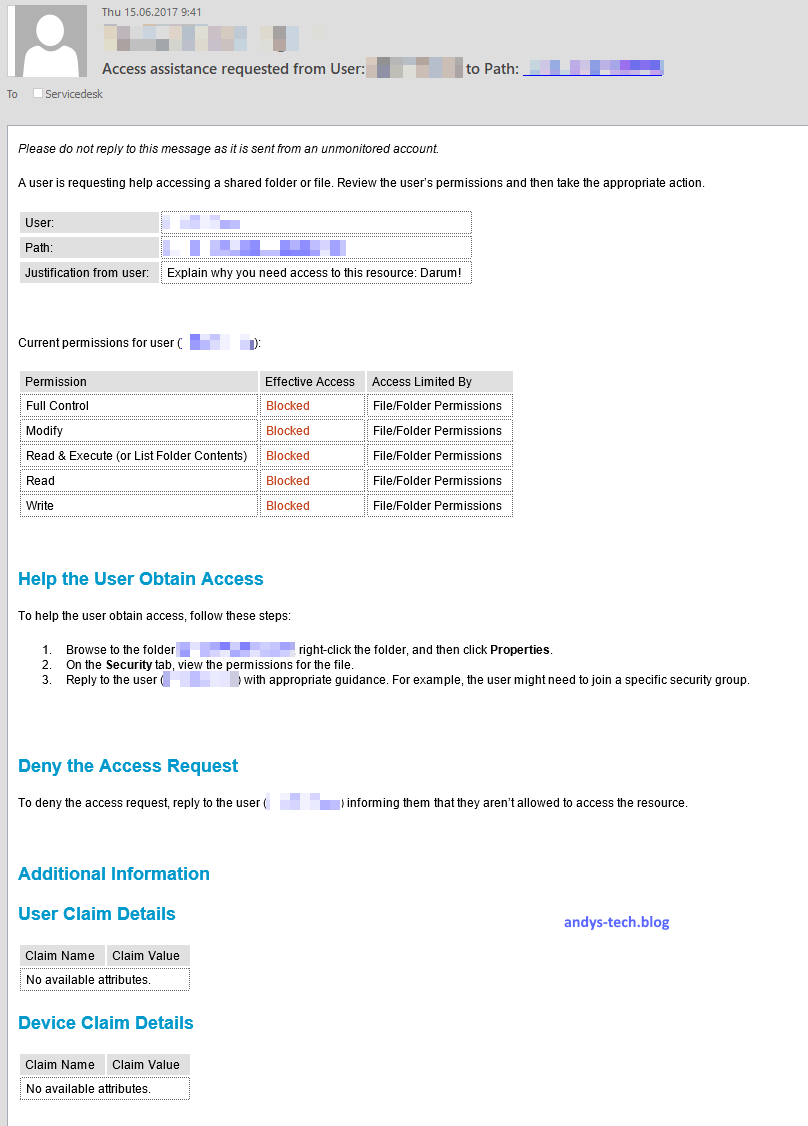
If the user wants to access a folder without proper permissions, he will get such an error message:
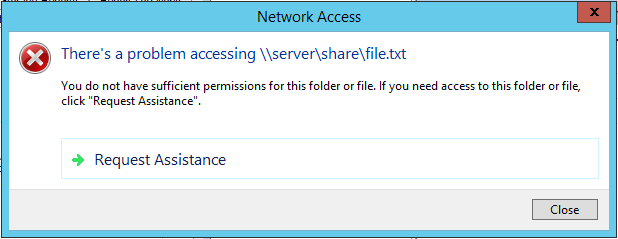
After clicking on “Request assistance”, he can enter a text why he wants to have access and then send the mail to the defined recipients.
Notification mail
Your notification mail will -depending on your settings- look like: