Learn how to install the Windows Server Update Services (WSUS) rols on a core installation of Windows Server 2019 or Windows Server 2016 (Including SSL setup).
The core version of Windows Server (or server without desktop experience) is a nice feature. It allows servers to run with a very small footprint and helps saving precious computing resources. One disadvantage of the core servers are the lack of GUIs for the functions and features the server is providing. This requires administrators to switch more often to Powershell to install, configure and administrate basic functionalities, which (on earlier versions) had a full-featured GUI.
After switching to core server and having a lot of hard work to set it up (partially due to my lack of Powershell skills in certain scenarios), I decided to write this guide to help you set up your WSUS on a core installation of Windows Server 2019 (Which works exactly the same on 2016) by using Powershell only (Plus the setup for SSL alternatively via GUI, if you want to use it).
Table of Contents
Prerequisites
- Installed and configured Windows Server 2016 or 2019 core
- Server is already added to the domain and has the required network settings, firewall rules, etc set up
- The server has an additional volume for the update files (Does not have to be setup within the server)
- Microsoft SQL-Server instance is already installed (If you want to use SQL server instead of the Windows internal database)
- An SSL certificate (If you want to use one) with private key and the password as pfx file
- Installed IIS Manager on your client, if you want to manage the IIS with a GUI
This guide will start directly with the installation, so all basic settings have to be done upfront. Use the command sconfig to open a tool for the main settings.
Important: This guide is provided as is and does not guarantee to be without errors or mistake. Use a test environment and create all necessary backups before proceeding.
Installation
Logon to your server and open a Powershell prompt (Via console, remote shell or remote desktop).
Preparing disk, volumes and drives
If your drives are all setup completely including initialization, formatting and drive letters, then you can skip this chapter.
The first thing you might want to change is the letter of your CD/DVD drive. Many tutorials set the WSUS hard disk on drive letter D, but that’s where the CD/DVD is often assigned to.
To change this, you are using the following command to change the drive letter from D to R:
Get-WmiObject -Class Win32_volume -Filter "DriveLetter = 'd:'" |Set-WmiInstance -Arguments @{DriveLetter='R:'}Next you have to initialize the second hard disk for the update files. Enter
Get-Disk
to get a list of hard disks.
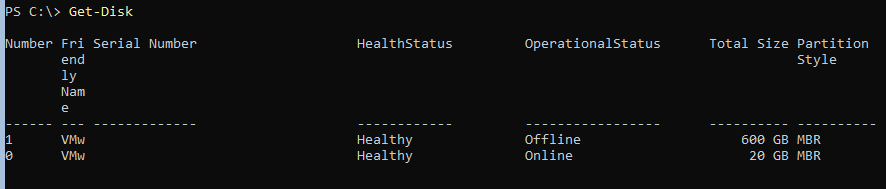
Check the column operational status. If one disk is shown as offline, remember the disk id and switch it to online (Change the 1 after number to your disk number):
Set-Disk -Number 1 -IsOffline $false
Now that disk has to be initialized. Use the same disk number for this command.
Initialize-Disk -Number 1
This initializes the disk using GPT partition style. If you want to use MBR add the parameter -PartitionStyle MBR to the command.
Next step is the creation of a partition.
New-Partition -DiskNumber 1 -Size 90GB -AssignDriveLetter
This creates a 90GB partition and assigns it a drive letter. If the partition should use the entire disk, replace the -Size parameter with -UseMaximumSize:
New-Partition -DiskNumber 1 -UseMaximumSize -AssignDriveLetter

Remember the drive letter of that drive. If you want to use a different letter:
Set-Partition –DriveLetter F -NewDriveLetter D
Now format the newly created drive.
Format-Volume -DriveLetter D -FileSystem NTFS -NewFileSystemLabel WSUS
The file system has to be NTFS (WSUS does not support ReFS) and I prefer the drive to be labeled WSUS, but you can name it whatever you want.
Now create a subfolder WSUS on the new drive as WSUS does not like its content folder to be placed in root.
New-Item -Path D: -Name WSUS -ItemType Directory
Install WSUS
Now, that the server is prepared for the WSUS role, let’s start with the installation.
If you would like to see all WSUS related features, use the Get-WindowsFeauter cmdlet:
Get-WindowsFeature –Name UpdateServices*
Important: The next command is different, depending on if you want to use the Windows Internal Database (WID) or an SQL server instance.
WID:
Install-WindowsFeature -Name UpdateServices-Services,UpdateServices-WidDB -IncludeManagementTools
With SQL server instance:
Install-WindowsFeature -Name UpdateServices-Services,UpdateServices-DB -IncludeManagementTools

If you have used the wrong command, uninstall the features with
Uninstall-WindowsFeature -Name names-from-the-command-used
and then enter the correct command again.
This will install the necessary files and services for your WSUS.
The last step is to tell your server, which SQL instance to use (If you are not using WID) and where to store the update files. Change to the tools folder in the WSUS application directory:
cd 'C:\Program Files\Update Services\tools'
You are going to use the program WSUSutil.exe, which offers many configuration possibilities for your WSUS. The parameter you are using is postinstall. It requires additional parameters depending on your environment.
Important: The next command is different, depending on if you want to use the Windows Internal Database (WID) or an SQL server instance.
WID:
.\WsusUtil.exe postinstall CONTENT_DIR=D:\WSUS
Change the directory if you are using a different path.
MS SQL server:
.\WsusUtil.exe postinstall SQL_INSTANCE_NAME="SQLServer\Instance" CONTENT_DIR=D:\WSUS
Change the SQL server name and instance and the path, if you are using a different folder.

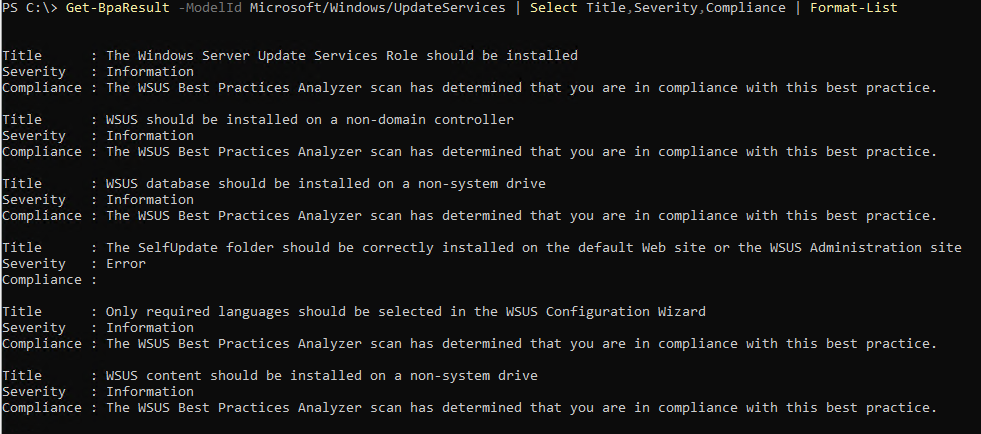
An optional step is to analyze your WSUS installation using the best practice analyzer:
Invoke-BpaModel -ModelId Microsoft/Windows/UpdateServices
Get-BpaResult -ModelId Microsoft/Windows/UpdateServices | Select Title,Severity,Compliance | Format-List
This gives you some hints on how to optimize your system.
And that’s it. Your WSUS is up and running. It does not use SSL and listens on port 8530. You can use the RSAT tools to manage the products, classifications and updates. The RSAT tools for Windows 7 can be downloaded here. Windows 10 as of version 1809 do not need an additional download. The RSAT tools have been moved to optional software features.
There are some optimizations, which are generally recommended for a WSUS installation. The first allows the IIS to use more memory (All available memory) and the second allows it to start more than one worker processes.
First change the private memory limit of the WSUS IIS application pool to 0:
Set-WebConfiguration -Filter "/system.applicationHost/applicationPools/add[@name='WsusPool']/recycling/periodicRestart/@privateMemory" -Value 0
And now change the maximum number of worker processes also to 0 (unlimited):
Set-WebConfiguration -Filter "/system.applicationHost/applicationPools/add[@name='WsusPool']/processModel/@maxProcesses" -Value 0
Configure SSL
Using Powershell
The first step is to import your SSL certificate. As you need to provide the password for your certificate and the cmdlets do not accept the password as plaintext, you need one step more. There are different ways to get the password as secure string. I decided to use the Get-Credential cmdlet:
$mypwd = Get-Credential -UserName 'Enter password below' -Message 'Enter password below'
The certificate file can be located on a local drive or a network or DFS path.
Import-PfxCertificate -FilePath "C:\mypfx.pfx" -CertStoreLocation Cert:\LocalMachine\My -Password $mypwd.Password -Exportable
The certificate store has to be in local machine. Otherwise you cannot use the certificate for your IIS.
And now back to the IIS.
To manage the ISS, you need an additional module:
Import-Module WebAdministration
First check if your WSUS website has bee published successfully:
Get-Website
This list should contain a website “WSUS Administration”.

You will perform 3 steps: you add the SSL certificate to the WSUS website, change some subfolders to require SSL and complete the SSL activation using Wsusutil.exe.
To add the certificate to the IIS binding, you need that binding as object:
$bind = Get-WebBinding -Name 'WSUS Administration' -Protocol https

Please be aware, that the image is not correct. The protocol is case sensitive and requires lowercase letters only. You do not get an error message otherwise, but it simply will not work.
Additionally you need the hash value for your certificate. You can get the hash of your certificate using this command:
Get-ChildItem cert:\LocalMachine\My

Now can you retrieve the object containing your certificate:
$SSLCert=Get-Item cert:\LocalMachine\My\HashOfCertificate
Replace HashOfCertificate with the hash (or thumbprint). Alternatively you can use the TAB key after my\ to switch through all certificates.
With these 2 object, you can finally merge them:
$bind.AddSslCertificate($SSLCert.GetCertHashString(),"my")
The WSUS website is available with SSL encryption as of now. This can be tested by opening https://yourwsus:8531 in a browser. Check the certificate details. If it is not working properly, you may have to restart the website by using the IISRESET command or restarting your server.
Now you need to enforce SSL for certain virtual directories:
Set-WebConfigurationProperty -PSPath 'MACHINE/WEBROOT/APPHOST' -Location 'WSUS Administration/ApiRemoting30' -Filter "system.webServer/Security/access" -Name "sslFlags" -Value "Ssl"
Set-WebConfigurationProperty -PSPath 'MACHINE/WEBROOT/APPHOST' -Location 'WSUS Administration/ClientWebService' -Filter "system.webServer/Security/access" -Name "sslFlags" -Value "Ssl"
Set-WebConfigurationProperty -PSPath 'MACHINE/WEBROOT/APPHOST' -Location 'WSUS Administration/DSSAuthWebService' -Filter "system.webServer/Security/access" -Name "sslFlags" -Value "Ssl"
Set-WebConfigurationProperty -PSPath 'MACHINE/WEBROOT/APPHOST' -Location 'WSUS Administration/ServerSyncWebService' -Filter "system.webServer/Security/access" -Name "sslFlags" -Value "Ssl"
Set-WebConfigurationProperty -PSPath 'MACHINE/WEBROOT/APPHOST' -Location 'WSUS Administration/SimpleAuthWebService' -Filter "system.webServer/Security/access" -Name "sslFlags" -Value "Ssl"
The last step is to complete the SSL configuration for the WSUS. This steps also allows you to specify a different URL (Example: Your server is called SRV01, but you would like to use wsus.company.local):
& 'C:\Program Files\Update Services\Tools\WsusUtil.exe' configuressl wsus.company.local
![]()
![]()
Restart the server to complete the installation.
Restart-Computer
This concludes the installation and setup of your WSUS and SSL using Powershell only.
Using a GUI
Already sick of using Powershell? Or do you still prefer a GUI? Then this section explains you how to switch your WSUS to SSL using (mainly) a GUI.
Please make sure, that you have installed the IIS manager on your client.
But before you can use a GUI, you have to do some steps in preparation.
The first step is to import your SSL certificate. As you need to provide the password for your certificate and the cmdlets do not accept the password as plaintext, you need one step more. There are different ways to get the password as secure string. I decided to use the Get-Credential cmdlet:
$mypwd = Get-Credential -UserName 'Enter password below' -Message 'Enter password below'
The certificate file can be located on a local drive or a network or DFS path.
Import-PfxCertificate -FilePath "C:\mypfx.pfx" -CertStoreLocation Cert:\LocalMachine\My -Password $mypwd.Password -Exportable
The certificate store has to be in local machine. Otherwise you cannot use the certificate for your IIS.
To administrate the IIS from a remote computer, you have to install a role and allow remote management via a registry key.
Install-WindowsFeature Web-Mgmt-Service
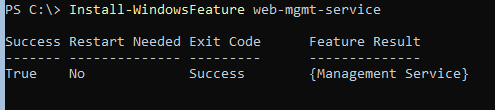
This feature contains all necessary files for remote management, but it is blocked by default as a security measure.
To enable remote connections, update the registry key HKEY_LOCAL_MACHINE\Software\Microsoft\WebManagement\Server\EnableRemoteManagement to 1:
Set-ItemProperty -Path HKLM:\Software\Microsoft\WebManagement\Server -Name EnableRemoteManagement -Value 1
Now start the remote management service:
Start-Service wmsvc
And now back to the GUI:
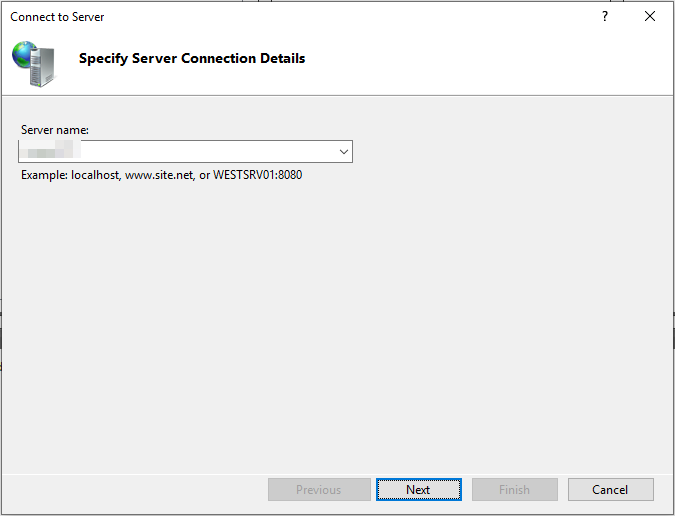
Open the IIS manager. Click on the “File” menu and select Connect to a server.
Enter the name or IP address of your server.
On the next screen, enter the credentials of an administrator for the IIS.

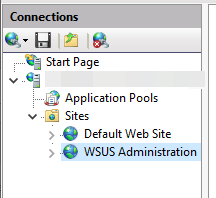
In the connections section, open your server, then Sites and click on WSUS Administration.
Click on Bindings… on the right side.
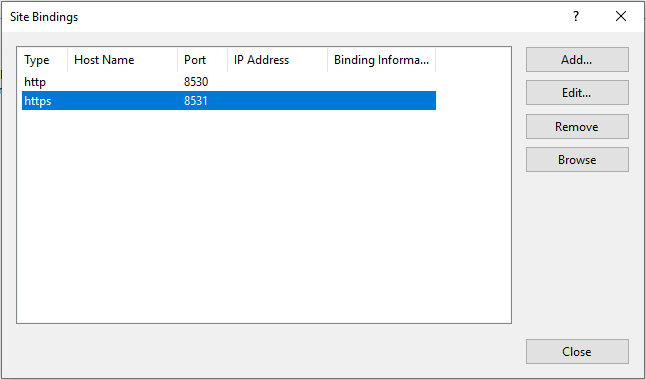
Select the row with https and click on edit….
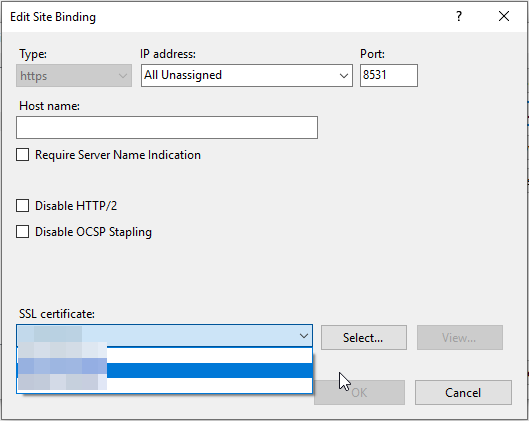
Choose your SSL certificate from the dropdown list below and click OK.
Close the bindings window.
This step has assigned your certificate to the https version of your WSUS websites. The next step is to enforce SSL for certain sites with your WSUS.
Expand your WSUS Administration site and select ApiRemoting30.

Double click on SSL Settings in the middle section.
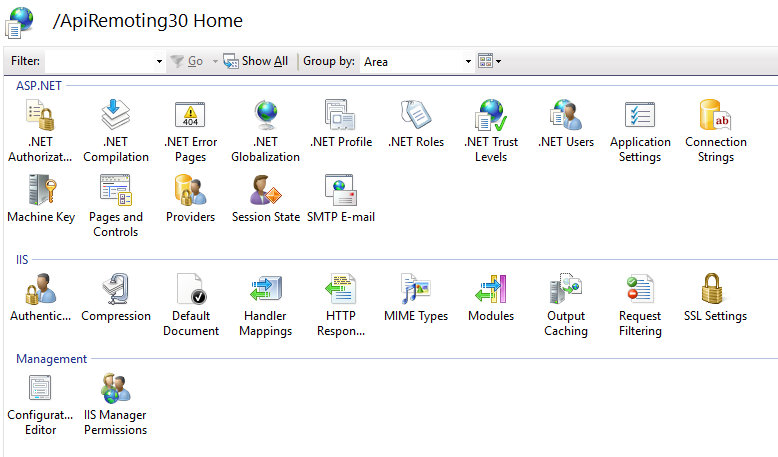
Check the box Require SSL and select Ignore.
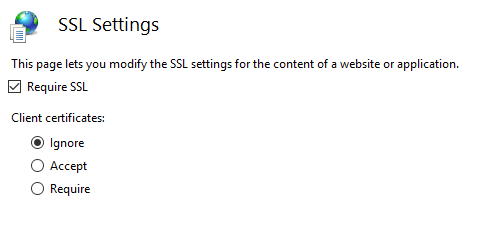
Click Apply on the right side.
Repeat these steps for the following directories (They are all under WSUS Administration):
- ApiRemoting30 (You already did this in the example)
- ClientWebService
- DSSAuthWebService
- ServerSyncWebService
- SimpleAuthWebService
The last step is to complete the SSL configuration for the WSUS. This again needs Powershell or a command prompt (My commands are for Powershell). It also allows you to specify a different URL (Example: Your server is called SRV01, but you would like to use wsus.company.local):
& 'C:\Program Files\Update Services\Tools\WsusUtil.exe' configuressl wsus.company.local
![]()
![]()
Restart the server to complete the installation.
Restart-Computer
I have the issue that “WsusUtil.exe configuressl wsus.company.local” reports URL: http://wsus:8530
The certificate is fine. All other steps for enable SSL are done. Updates getting installed, but I have some issues with rollupreporting to the upstream (Not a network issue, wireshark on the doenstrem server did not see packets moving). I also have some issues in the SoftwareDistribution.log on the WSUS like “RollupAgent.WakeUpWorkerThreadProc Rollup Failed. Error=The request failed with HTTP status 403: Forbidden.”
and also some other 403 for different other task.
Any body an idea?
yep i know that but how to create it on a core server
can u give me please the command
Thanks
hello,
can u help me with this error please
[wsus19_core]: PS C:\Users\Administrator\Documents> Import-PfxCertificate -FilePath “C:\mypfx.pfx” -CertStoreLocation Cert:\LocalMachine\My -Password $mypwd.Password -Exportable
Import-PfxCertificate : The PFX file could not be found.
At line:1 char:1
+ Import-PfxCertificate -FilePath “C:\mypfx.pfx” -CertStoreLocation Cer …
+ ~~~~~~~~~~~~~~~~~~~~~~~~~~~~~~~~~~~~~~~~~~~~~~~~~~~~~~~~~~~~~~~~~~~~~
+ CategoryInfo : NotSpecified: (:) [Import-PfxCertificate], FileNotFoundException
+ FullyQualifiedErrorId : System.IO.FileNotFoundException,Microsoft.CertificateServices.Commands.ImportPfxCertificate
thanks
The error message indicates that your certificate file does not exist.
Import-PfxCertificate -FilePath “C:\mypfx.pfx” -CertStoreLocation Cert:\LocalMachine\My -Password $mypwd.Password -Exportable
How to make a certificate before importation in a core server ?
This should work with the Get-Certificate command to request a new certificate. In that case you won’t need to import it afterwards as the command does that for you.
This is the simplest WSUS provisioning guide I have ever seen. I’ve always considered WSUS fairly disposable and this makes provisioning WSUS servers a snap. Thanks for posting
The only thing I needed to do outside the steps here was add the WSUS server with read and enroll rights to the “WebServer” certificate template and request a certificate with the FQDN as the name and SAN from our domain certificate server.
This is the command to retrieve a cert from an internal CA:
cd Cert:\LocalMachine\My
Get-Certificate -Template WebServer -Url ldap: -DnsName -SubjectName CN=
You have an small error on the WID Install here:
“Install-WindowsFeature -Name UpdateServices-Services -IncludeManagementTools”
With this you don’t install WID. You have to take this: Install-WindowsFeature UpdateServices -IncludeManagementTools
Hi and thank you for the hint.
I have updated the post accordingly.
Thanks for tip about “Set-WebConfigurationProperty” was trying to change SSL configuration through GUI from remote server and it kept saying “Insufficient permissions”. This command solved it!